Thursday, January 20, 2011

Faux Mosaic


Once again I was challenged with finding a use for obsolete materials. My husband came home with a box full of advertising fliers from work, so I got to work coming up with a new project. I am also scheduled to teach at Art Week at a local elementary school and needed one more project to add to the week, so the faux mosaic frames with portraits was born.

The frames are made out of cardboard, painted with acrylic paint. I cut the advertising into 1/2 inch squares and had my kids patiently glue the squares onto the frame to look like a mosaic. Once the pieces were glued in place we covered the frames with glossy Mod Podge. I took a profile picture of each of the kids with my digital camera, then traced their profiles directly from the computer screen. Since the profile pictures were pretty small, I chose to cut them out instead of asking the kids to do this. It takes a pretty steady hand to cut the profiles out so that they look like the child you photographed.

I am looking forward to trying this project with 60 kids next month during Art Week. I asked two neighbor kids to come and try this project with my kids so that I could get a feel for how long it would take them to complete the project and I wanted to see the results from a range of ages. The photos I have posted are from a kindergartner, 2nd and 3rd grader.
Thursday, December 23, 2010

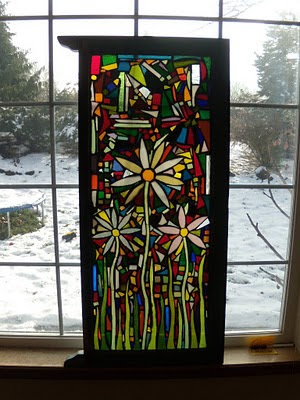
Jess Caudill- Caudill Glassworks


I wanted to highlight an artist who has tremendous talent and also happens to be my husband. Jess has been working with glass as a glass fuser for the past 11 years, but has recently tried his hand at glass mosaics. He has boxes full of scrap glass from his fusing projects and decided to use the scraps to create these beautiful mosaics. Jess finds old windows with the glass still intact and covers them with his scrap glass to make colorful pictures. We have them placed on our window sills and with the sun shining through them, they are breathtaking.

Wyeast Bag


My husband challenged me with the task of making a bag for his boss using their company's packaging as a Christmas gift. At first I was excited by the idea of using a new material to create a bag. I had seen a similar bag and had an idea of how I wanted to make it. I don't know how many times I have thanked my lucky stars for buying my industrial machine this year! I can sew through anything! Little did I realize how difficult this project was going to be when I agreed to it. I should remind you that I am a self-taught sewer and that I rarely know what I am doing when I begin a project. Once again I found myself in the situation of not thinking through the project and wishing I had sewed the straps on before constructing the bag. This was also the first time I had finished off a bag with nylon cording. The liquid yeast bags are not very flexible, compared to traditional fabric, and working with inflexible corners was difficult. After 3 or more hours and 2 attempts, I completed the bag.
I am very proud of completing this bag because there were many times that I was ready to call it quits. I think my husband's boss will love the bag... I just hope it doesn't fall apart!!!

Coffee Sleeves


My local coffee shop, Ten-Speed Coffee, roasts their own coffee. The coffee comes to them from around the world in large burlap bags. Of course, I wanted to make something out of the bags and coffee sleeves seemed like a logical choice. I am now making reversible coffee sleeves using the coffee sacks, cotton batting and scrap fabric. This serves the purpose of re-using the coffee sacks and dwindling down my extremely large stash of scrap fabric.

Monday, December 13, 2010

New Last Minute Holiday Sales

I just added two more holiday sales to my agenda this year.

December 17th-18th
Local Artists Holiday Sale
Downtown Hood River.... in the old "Frolic" store space between "Parts and Labour" and "Hood River Stationers"
12-7pm Friday
10-7pm Saturday

December 17th
Artisan Holiday Sale
3 Rivers Grill
5-8pm

I am looking forward to these two sales since I will be surrounded by other Gorge artists. Hood River and the Columbia Gorge is full of creative individuals who have a similar passion to create as I do.

Wednesday, November 10, 2010

Recycled Sweater Mittens


These mittens are made from reclaimed sweaters. I find coordinating sweaters to cut up, then resew. They are lined with super-soft minky fleece which makes them extra warm and cozy. My minky fleece can be scraps from my friends business, SwaddleKeeper, or since I know my winters are filled with making mittens, I look for remnents and sales throughout the year. The mittens are probably one of my favorite items to make since they each turn out differently.

Wednesday, October 27, 2010

Reusable Celebrations


I have been working in my daughter's school as the resident Master Recycler teaching classes about recycling. One lesson I will teach will be about durable vs. disposable goods and help the class put together a reusable party pack. This pack will be a tote filled with reusable plates, cups, utensils, cloth napkins and a reusable celebration banner. The idea is that the classes will use durable goods for their class celebrations instead of disposable items that will go to the landfill. Imagine how much waste will be diverted if all classes used durable goods for all of their parties!

I love the idea of presenting the classes with these Reusable Party Packs, but I wanted the kids to take more ownership in the project than just being the recipient of a tote full of items. I arranged for an afternoon in my daughter's 2nd grade class to teach a lesson and work with the students to create a reusable celebration banner that could be used at all parties. I wanted it made from recycled materials and be versatile enough to use throughout the year, so I can up with this mosaic banner made from cereal boxes and magazine scraps. The students worked in small groups and had the task of creating a letter for the banner. While the class was working hard ripping out colorful magazine pages for their mosaics, student came to me 2 at a time to work on making a cloth napkin. I brought my serger into the classroom along with fabric donated by the students. Each student picked out a piece of fabric and traced a 12"x12" square, then handed it to me to serge the edges. The kids were fascinated by the serger and I had fun teaching them how the machine worked. They were all excited about the professional looking cloth napkin that was created and took ownership in the specific napkin they made. Many students wanted to make more than one and were pleased to be asked to help with more napkins for the students that were absent or guests that may come to the party.

We have also made a happy birthday banner that hangs in the dining room during each family birthday we celebrate in our home.